Bootstrap Tabs and Pills
Menus
Most web pages have some kind of a menu.
In HTML, a menu is often defined in an unordered list <ul> (and styled afterwards), like this:
<ul> <li><a href="#">Home</a></li> <li><a href="#">Menu 1</a></li> <li><a href="#">Menu 2</a></li> <li><a href="#">Menu 3</a></li></ul>
If you want to create a horizontal menu of the list above, add the .list-inline class to <ul>:
Or you can display the menu above with Bootstraps' Tabs and Pills (see below).
Note: See the last example on this page to find out how to make tabs and pills toggleable/dynamic.
Tabs
Tabs are created with <ul>:
Tip: Also mark the current page with <li>.
The following example creates navigation tabs:
Example
<ul> <li><a href="#">Home</a></li> <li><a href="#">Menu 1</a></li> <li><a href="#">Menu 2</a></li> <li><a href="#">Menu 3</a></li></ul>
Try it Yourself »Tabs With Dropdown Menu
Tabs can also hold dropdown menus.
The following example adds a dropdown menu to "Menu 1":
Example
<ul> <li><a href="#">Home</a></li> <li> <a data-toggle="dropdown" href="#">Menu 1 <span></span></a> <ul> <li><a href="#">Submenu 1-1</a></li> <li><a href="#">Submenu 1-2</a></li> <li><a href="#">Submenu 1-3</a></li> </ul> </li> <li><a href="#">Menu 2</a></li> <li><a href="#">Menu 3</a></li></ul>
Try it Yourself »Pills
Pills are created with <ul>. Also mark the current page with <li>:
Example
<ul> <li><a href="#">Home</a></li> <li><a href="#">Menu 1</a></li> <li><a href="#">Menu 2</a></li> <li><a href="#">Menu 3</a></li></ul>
Try it Yourself »Vertical Pills
Pills can also be displayed vertically. Just add the .nav-stacked class:
Example
<ul> <li><a href="#">Home</a></li> <li><a href="#">Menu 1</a></li> <li><a href="#">Menu 2</a></li> <li><a href="#">Menu 3</a></li> </ul>
Try it Yourself »Vertical Pills in a Row
The following example places the vertical pill menu inside the last column. So, on a large screen the menu will be displayed to the right. But on a small screen, the content will automatically adjust itself into a single-column layout:
Example
<div> <ul> <li><a href="#">Home</a></li> <li><a href="#">Menu 1</a></li> <li><a href="#">Menu 2</a></li> <li><a href="#">Menu 3</a></li> </ul> </div>
Try it Yourself »Pills With Dropdown Menu
Pills can also hold dropdown menus.
The following example adds a dropdown menu to "Menu 1":
Example
<ul> <li><a href="#">Home</a></li> <li> <a data-toggle="dropdown" href="#">Menu 1 <span></span></a> <ul> <li><a href="#">Submenu 1-1</a></li> <li><a href="#">Submenu 1-2</a></li> <li><a href="#">Submenu 1-3</a></li> </ul> </li> <li><a href="#">Menu 2</a></li> <li><a href="#">Menu 3</a></li></ul>
Try it Yourself »Centered Tabs and Pills
To center/justify the tabs and pills, use the .nav-justified class.
Note that on screens that are smaller than 768px, the list items are stacked (content will remain centered):
Example
Home Menu 1 Menu 2 Menu 3<!-- Centered Pills --><ul> <li><a href="#">Home</a></li> <li><a href="#">Menu 1</a></li> <li><a href="#">Menu 2</a></li> <li><a href="#">Menu 3</a></li></ul>
Try it Yourself »Toggleable / Dynamic Tabs
HOME
Lorem ipsum dolor sit amet, consectetur adipisicing elit, sed do eiusmod tempor incididunt ut labore et dolore magna aliqua.
To make the tabs toggleable, add the data-toggle="tab" attribute to each link. Then add a .tab-pane class with a unique ID for every tab and wrap them inside a <div> element with class .tab-content.
If you want the tabs to fade in and out when clicking on them, add the .fade class to .tab-pane:
Example
Home Menu 1 Menu 2<div> <div> <h4>HOME</h4> <p>Some content.</p> </div> <div> <h4>Menu 1</h4> <p>Some content in menu 1.</p> </div> <div> <h4>Menu 2</h4> <p>Some content in menu 2.</p> </div></div>
Try it Yourself »Toggleable / Dynamic Pills
The same code applies to pills; only change the data-toggle attribute to data-toggle="pill":
Example
Home Menu 1 Menu 2<div> <div> <h4>HOME</h4> <p>Some content.</p> </div> <div> <h4>Menu 1</h4> <p>Some content in menu 1.</p> </div> <div> <h4>Menu 2</h4> <p>Some content in menu 2.</p> </div></div>
Try it Yourself »Test Yourself with Exercises!
Exercise 1 » Exercise 2 » Exercise 3 » Exercise 4 » Exercise 5 » Exercise 6 »
Complete Bootstrap Navigation Reference
For a complete reference of all navigation classes, go to our complete Bootstrap Navigation Reference.
For a complete reference of all tab options, methods and events, go to our Bootstrap JS Tab Reference.
www.w3schools.com
Bootstrap 4 Navs
Nav Menus
Link Link Link DisabledIf you want to create a simple horizontal menu, add the .nav class to a <ul> element, followed by .nav-item for each <li> and add the .nav-link class to their links:
Example
<ul> <li> <a href="#">Link</a> </li> <li> <a href="#">Link</a> </li> <li> <a href="#">Link</a> </li> <li> <a href="#">Disabled</a> </li></ul>
Try it Yourself »Aligned Nav
Link Link Link Disabled Link Link Link DisabledAdd the .justify-content-center class to center the nav, and the .justify-content-end class to right-align the nav.
Vertical Nav
Link Link Link DisabledAdd the .flex-column class to create a vertical nav:
Tabs
Active Link Link DisabledTurn the nav menu into navigation tabs with the .nav-tabs class. Add the active class to the active/current link. If you want the tabs to be togglable, see the last example on this page.
Example
<ul> <li> <a href="#">Active</a> </li> <li > <a href="#">Link</a> </li> <li> <a href="#">Link</a> </li> <li> <a href="#">Disabled</a> </li></ul>
Try it Yourself »Pills
Active Link Link DisabledTurn the nav menu into navigation pills with the .nav-pills class. If you want the pills to be togglable, see the last example on this page.
Example
<ul> <li> <a href="#">Active</a> </li> <li > <a href="#">Link</a> </li> <li> <a href="#">Link</a> </li> <li> <a href="#">Disabled</a> </li></ul>
Try it Yourself »Justified Tabs/pills
Justify the tabs/pills with the .nav-justified class (equal width):
Example
<ul>..</ul><ul>..</ul>
Try it Yourself »Pills with Dropdown
Example
<ul> <li> <a href="#">Active</a> </li> <li > <a data-toggle="dropdown" href="#">Dropdown</a> <div> <a href="#">Link 1</a> <a href="#">Link 2</a> <a href="#">Link 3</a> </div> </li> <li> <a href="#">Link</a> </li> <li> <a href="#">Disabled</a> </li></ul>
Try it Yourself »Tabs with Dropdown
Example
<ul> <li> <a href="#">Active</a> </li> <li > <a data-toggle="dropdown" href="#">Dropdown</a> <div> <a href="#">Link 1</a> <a href="#">Link 2</a> <a href="#">Link 3</a> </div> </li> <li> <a href="#">Link</a> </li> <li> <a href="#">Disabled</a> </li></ul>
Try it Yourself »Toggleable / Dynamic Tabs
HOME
Lorem ipsum dolor sit amet, consectetur adipisicing elit, sed do eiusmod tempor incididunt ut labore et dolore magna aliqua.
To make the tabs toggleable, add the data-toggle="tab" attribute to each link. Then add a .tab-pane class with a unique ID for every tab and wrap them inside a <div> element with class .tab-content.
If you want the tabs to fade in and out when clicking on them, add the .fade class to .tab-pane:
Example
Home Menu 1 Menu 2<!-- Tab panes --><div> <div >...</div> <div >...</div> <div>...</div> </div>
Try it Yourself »Toggleable / Dynamic Pills
HOME
Lorem ipsum dolor sit amet, consectetur adipisicing elit, sed do eiusmod tempor incididunt ut labore et dolore magna aliqua.
The same code applies to pills; only change the data-toggle attribute to data-toggle="pill":
Example
Home Menu 1 Menu 2<!-- Tab panes --><div> <div >...</div> <div >...</div> <div>...</div> </div>
Try it Yourself »www.w3schools.com
Bootstrap Navigation Bar
Navigation Bars
A navigation bar is a navigation header that is placed at the top of the page:
With Bootstrap, a navigation bar can extend or collapse, depending on the screen size.
A standard navigation bar is created with <nav>.
The following example shows how to add a navigation bar to the top of the page:
Example
<nav> <div> <div> <a href="#">WebSiteName</a> </div> <ul> <li><a href="#">Home</a></li> <li><a href="#">Page 1</a></li> <li><a href="#">Page 2</a></li> <li><a href="#">Page 3</a></li> </ul> </div> </nav> ...
Try it Yourself »Note: All of the examples on this page will show a navigation bar that takes up too much space on small screens (however, the navigation bar will be on one single line on large screens - because Bootstrap is responsive). This problem (with the small screens) will be solved in the last example on this page.
Inverted Navigation Bar
If you don't like the style of the default navigation bar, Bootstrap provides an alternative, black navbar:
Just change the .navbar-default class into .navbar-inverse:
Example
<nav> <div> <div> <a href="#">WebSiteName</a> </div> <ul> <li><a href="#">Home</a></li> <li><a href="#">Page 1</a></li> <li><a href="#">Page 2</a></li> <li><a href="#">Page 3</a></li> </ul> </div></nav>
Try it Yourself »Navigation Bar With Dropdown
Navigation bars can also hold dropdown menus.
The following example adds a dropdown menu for the "Page 1" button:
Example
<nav> <div> <div> <a href="#">WebSiteName</a> </div> <ul> <li><a href="#">Home</a></li> <li> <a data-toggle="dropdown" href="#">Page 1 <span></span></a> <ul> <li><a href="#">Page 1-1</a></li> <li><a href="#">Page 1-2</a></li> <li><a href="#">Page 1-3</a></li> </ul> </li> <li><a href="#">Page 2</a></li> <li><a href="#">Page 3</a></li> </ul> </div> </nav>
Try it Yourself »Right-Aligned Navigation Bar
The .navbar-right class is used to right-align navigation bar buttons.
In the following example we insert a "Sign Up" button and a "Login" button to the right in the navigation bar. We also add a glyphicon on each of the two new buttons:
Example
<nav> <div> <div> <a href="#">WebSiteName</a> </div> <ul> <li><a href="#">Home</a></li> <li><a href="#">Page 1</a></li> <li><a href="#">Page 2</a></li> </ul> <ul> <li><a href="#"><span></span> Sign Up</a></li> <li><a href="#"><span></span> Login</a></li> </ul> </div></nav>
Try it Yourself »Navbar Buttons
To add buttons inside the navbar, add the .navbar-btn class on a Bootstrap button:
Example
<nav> <div> <div> <a href="#">WebSiteName</a> </div> <ul> <li><a href="#">Home</a></li> <li><a href="#">Link</a></li> <li><a href="#">Link</a></li> </ul> <button>Button</button> </div> </nav>
Try it Yourself »Navbar Forms
To add form elements inside the navbar, add the .navbar-form class to a form element and add an input(s). Note that we have added a .form-group class to the div container holding the input. This adds proper padding if you have more than one inputs (you will learn more about this in the Forms chapter).
Example
<nav> <div> <div> <a href="#">WebSiteName</a> </div> <ul> <li><a href="#">Home</a></li> <li><a href="#">Page 1</a></li> <li><a href="#">Page 2</a></li> </ul> <form action="/action_page.php"> <div> <input type="text" placeholder="Search"> </div> <button type="submit">Submit</button> </form> </div> </nav>
Try it Yourself »You can also use the .input-group and .input-group-addon classes to attach an icon or help text next to the input field. You will learn more about these classes in the Bootstrap Inputs chapter.
Example
<form action="/action_page.php"> <div> <input type="text" placeholder="Search"> <div> <button type="submit"> <i></i> </button> </div> </div></form>
Try it Yourself »Navbar Text
Use the .navbar-text class to vertical align any elements inside the navbar that are not links (ensures proper padding and text color).
Example
<nav> <ul> <li><a href="#">Link</a></li> <li><a href="#">Link</a></li> </ul> <p>Some text</p> </nav>
Try it Yourself »Fixed Navigation Bar
The navigation bar can also be fixed at the top or at the bottom of the page.
A fixed navigation bar stays visible in a fixed position (top or bottom) independent of the page scroll.
The .navbar-fixed-top class makes the navigation bar fixed at the top:
Example
<nav> <div> <div> <a href="#">WebSiteName</a> </div> <ul> <li><a href="#">Home</a></li> <li><a href="#">Page 1</a></li> <li><a href="#">Page 2</a></li> <li><a href="#">Page 3</a></li> </ul> </div></nav>
Try it Yourself »The .navbar-fixed-bottom class makes the navigation bar stay at the bottom:
Example
<nav> <div> <div> <a href="#">WebSiteName</a> </div> <ul> <li><a href="#">Home</a></li> <li><a href="#">Page 1</a></li> <li><a href="#">Page 2</a></li> <li><a href="#">Page 3</a></li> </ul> </div></nav>
Try it Yourself »Collapsing The Navigation Bar
The navigation bar often takes up too much space on a small screen.
We should hide the navigation bar; and only show it when it is needed.
In the following example the navigation bar is replaced by a button in the top right corner. Only when the button is clicked, the navigation bar will be displayed:
Example
<nav> <div> <div> <button type="button" data-toggle="collapse" data-target="#myNavbar"> <span></span> <span></span> <span></span> </button> <a href="#">WebSiteName</a> </div> <div> <ul> <li><a href="#">Home</a></li> <li><a href="#">Page 1</a></li> <li><a href="#">Page 2</a></li> <li><a href="#">Page 3</a></li> </ul> <ul> <li><a href="#"><span></span> Sign Up</a></li> <li><a href="#"><span></span> Login</a></li> </ul> </div> </div></nav>
Try it Yourself »Test Yourself with Exercises!
Exercise 1 » Exercise 2 » Exercise 3 » Exercise 4 »
www.w3schools.com
Navbar (Уроки Bootstrap 3) - Уроки от сайта Pro-Cod.ru
В этом уроке я постараюсь разобрать компонент navbar в Boostrap 3. Этот компонент полезен и может очень пригодится при верстке шаблона. Компонент navbar так же как и все блоки Bootstrap имеет полезное свойство сворачивания.
Navbar на компьютерах
Так выглядит navbar на компьютерах все элементы присутствуют
Navbar на мобильных устройствах
Так выглядит navbar на мобильных устройствах все элементы прячутся и появляются по нажатию на кнопку
Navbar может быть:
- Зафиксирован сверху — при прокрутке navbar всегда будет сверху
- Зафиксирован снизу — при прокрутке navbar всегда будет снизу
С теорией ознакомились теперь нам предстоит разобрать не простой код. Navbar в Bootstrap заключается в тег nav. Следующий код я буду разбивать на части и постараюсь объяснить для чего нужен тот или иной фрагмент кода.
<nav role="navigation"> <div> <!-- Название компании и кнопка, которая отображается для мобильных устройств группируются для лучшего отображения при свертывании --> <div> <button type="button" data-toggle="collapse" data-target="#bs-example-navbar-collapse-1"> <span>Toggle navigation</span> <span></span> <span></span> <span></span> </button> <a href="#">Brand</a> </div> <!-- Группируем ссылки, формы, выпадающее меню и прочие элементы --> <div> <ul> <li><a href="#">Link</a></li> <li><a href="#">Link</a></li> <li> <a href="#" data-toggle="dropdown">Dropdown <b></b></a> <ul> <li><a href="#">Action</a></li> <li><a href="#">Another action</a></li> <li><a href="#">Something else here</a></li> <li></li> <li><a href="#">Separated link</a></li> <li></li> <li><a href="#">One more separated link</a></li> </ul> </li> </ul> <form role="search"> <div> <input type="text" placeholder="Search"> </div> <button type="submit">Submit</button> </form> <ul> <li><a href="#">Link</a></li> <li> <a href="#" data-toggle="dropdown">Dropdown <b></b></a> <ul> <li><a href="#">Action</a></li> <li><a href="#">Another action</a></li> <li><a href="#">Something else here</a></li> <li></li> <li><a href="#">Separated link</a></li> </ul> </li> </ul> </div><!-- /.navbar-collapse --> </div><!-- /.container-fluid --> </nav>Резиновостью navbar можно управлять меняя значение класса.
<div>Можно вместо container-fluid поставить просто container, тогда navbar не будет растягиваться на всю ширину экрана,а примет ширину container по-умолчанию. Максимальная ширина container составляет 1170px
Следующая часть кода отвечает за название организации(фирмы) и кнопку, которая появляется на мобильных устройствах
<div> <button type="button" data-toggle="collapse" data-target="#bs-example-navbar-collapse-1"> <span>Toggle navigation</span> <span></span><!--Полоски на кноке--> <span></span> <span></span> </button> <a href="#">Brand</a><!--Название организации(фирмы)--> </div>Следующий код хранит в себе элементы navbar.
<!-- Группируем ссылки, формы, выпадающее меню и прочие элементы --> <div> <ul> <li><a href="#">Link</a></li> <li><a href="#">Link</a></li> <li> <a href="#" data-toggle="dropdown">Dropdown <b></b></a> <ul> <li><a href="#">Action</a></li> <li><a href="#">Another action</a></li> <li><a href="#">Something else here</a></li> <li></li> <li><a href="#">Separated link</a></li> <li></li> <li><a href="#">One more separated link</a></li> </ul> </li> </ul> <form role="search"> <div> <input type="text" placeholder="Search"> </div> <button type="submit">Submit</button> </form> <ul> <li><a href="#">Link</a></li> <li> <a href="#" data-toggle="dropdown">Dropdown <b></b></a> <ul> <li><a href="#">Action</a></li> <li><a href="#">Another action</a></li> <li><a href="#">Something else here</a></li> <li></li> <li><a href="#">Separated link</a></li> </ul> </li> </ul> </div><!-- /.navbar-collapse -->В мобильных устройствах все эти элементы мы будем видеть по нажатию на кнопку
Для того чтобы в мобильных версиях по нажатию кнопоки отображались элементы нужно чтобы совпадали следующие id
В примере для разбора navbar есть простые элементы такие как ссылка, но есть и сложные элементы это форма, выпадающий список. Для создания меню на основе navbar нужно использовать список ul
<ul> <li><a href="#">Link</a></li> <li><a href="#">Link</a></li> <li> <a href="#" data-toggle="dropdown">Dropdown <b></b></a> <ul> <li><a href="#">Action</a></li> <li><a href="#">Another action</a></li> <li><a href="#">Something else here</a></li> <li></li> <li><a href="#">Separated link</a></li> <li></li> <li><a href="#">One more separated link</a></li> </ul> </li> </ul>Классы nav navbar-nav нужны для того чтобы элементы списка ul располагались горизонтально. Для создания простой ссылки в меню можно использовать следующий код
<li><a href="#">Link</a></li>Для выделения активного пункта меню нужно использовать класс active
Для того чтобы вывести выпадающее меню нужно родительскому li добавить класс dropdown и внутри элемента разместить каретку по нажатию на которую будет выпадать меню. Во вложенный список ul нужно добавить класс dropdown-menu
<li> <a href="#" data-toggle="dropdown">Dropdown <b></b></a><!--Каретка--> <ul><!--Вложенный список который будет выпадать--> <li><a href="#">Action</a></li> <li><a href="#">Another action</a></li> <li><a href="#">Something else here</a></li> <li></li><!--Разделительная линия--> <li><a href="#">Separated link</a></li> <li></li> <li><a href="#">One more separated link</a></li> </ul> </li>Фиксация navbar сверху Для того чтобы зафиксировать navbar сверху нужно добавить класс navbar-fixed-top
<nav role="navigation">Фиксация navbar снизу Для того чтобы зафиксировать navbar снизу нужно добавить класс navbar-fixed-bottom
<nav role="navigation">Готовый пример — Скачать
comments powered by HyperCommentspro-cod.ru
Creating Responsive Navigation Menus - Bootstrap Navbars
Today in this tutorial i am gonna show you How to create Responsive static and fixed navigation Menu bars , headers using Bootstrap. Navigation bar is a navigation header that is placed at the top of the page and can be extend or collapse depending on the screen size, Bootstrap made it easy. Now we will cover here creating a static and fixed top navigation bars along with drop-down menu and with search box. It can be made using Bootstrap's Navbar component. These responsive navbar initially collapsed on devices. i have used here latest bootstrap version 3.3.7, so have a look at this simple yet useful tutorial.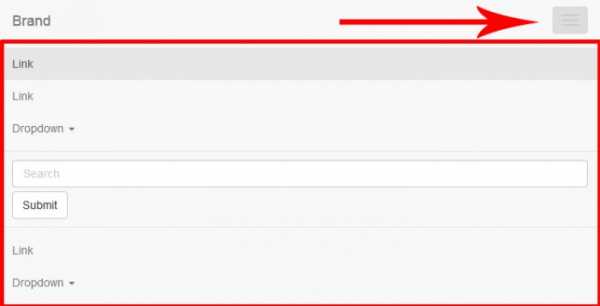
Bootstrap File Settings
Of course you will need bootstrap CSS/JS files and one jQuery library file which will make things easier. check out the below file structure. <!DOCTYPE html> <html> <head> <meta http-equiv="X-UA-Compatible" content="IE=edge"> <meta name="viewport" content="width=device-width, initial-scale=1"> <link rel="stylesheet" href="https://maxcdn.bootstrapcdn.com/bootstrap/3.3.7/css/bootstrap.min.css"> </head> <body> <!-- Page Content will be here... --> <!-- Put JS files here. --> <script src="https://ajax.googleapis.com/ajax/libs/jquery/1.12.4/jquery.min.js"></script> <script src="https://maxcdn.bootstrapcdn.com/bootstrap/3.3.7/js/bootstrap.min.js"></script> </body> </html>Now Let's have a look at creating navigation bars.
Static Top Navnar
The following example will show you how to create a simple static navbar with navigation links. <nav> <div> <div> <button type="button" data-toggle="collapse" data-target="#navbar" aria-expanded="false" aria-controls="navbar"> <span>Toggle navigation</span> <span></span> <span></span> <span></span> </button> <a href="#">Coding Cage</a> </div> <div> <ul> <li><a href="#">Home</a></li> <li><a href="#about">About</a></li> <li><a href="#contact">Contact</a></li> </ul> </div><!--/.nav-collapse --> </div> </nav>This is how you can create a simple static navigation menu bar. just add this code after starting <body> tag. you will get static menu bar. Lets go ahead.Fixed Top Navbar
Okay, we have done with static navbar, now i'll show how to create fixed navbar menu, that will stick to the top even after page scroll down/up. <!-- Fixed navbar --> <nav> <div> <div> <button type="button" data-toggle="collapse" data-target="#navbar" aria-expanded="false" aria-controls="navbar"> <span>Toggle navigation</span> <span></span> <span></span> <span></span> </button> <a href="#">Coding Cage</a> </div> <div> <ul> <li><a href="#">Home</a></li> <li><a href="#about">About</a></li> <li><a href="#contact">Contact</a></li> </ul> </div><!--/.nav-collapse --> </div> </nav> Looks like static menu right ? yes this is the same code which we saw in static menu, but there's a little change over there at the first line, this one navbar-fixed-top.Navigation with Dropdown Menu
Following is the sample code which will show you how to add another menu as a dropdown menu, let's have a look. <li> <a href="#" data-toggle="dropdown" role="button" aria-haspopup="true" aria-expanded="false">PHP Tutorials<span></span></a> <ul> <li><a href="#">PHP with OOP</a></li> <li><a href="#">PHP with PDO</a></li> <li><a href="#">PHP with MySQLi</a></li> <li role="separator"></li> <li>PHP Scripts</li> <li><a href="#">PHP Login System</a></li> <li><a href="#">PHP Admin System</a></li> </ul> </li>Here you doesn't need to do something additional here just ad a new entire <li> element wherever you want dropdown menu and give it there you will have to give some extra piece of tags in <a> element as shown above.Navbar with Search Box
In this example i have taken fixed navbar so it becomes fixed navbar with search box, just have to add <form> element here with input box. see the example.<nav> <div> <div> <button type="button" data-toggle="collapse" data-target="#navbar" aria-expanded="false" aria-controls="navbar"> <span>Toggle navigation</span> <span></span> <span></span> <span></span> </button> <a href="#">Coding Cage</a> </div> <div> <ul> <li><a href="#">Home</a></li> <li><a href="#about">About</a></li> <li><a href="#contact">Contact</a></li> </ul> <form> <input type="text" placeholder="Search..."> </form> </div><!--/.nav-collapse --> </div> </nav>all the menu links are in the left side and the search form is in right side so that it looks well. by using this class you can put any link on right side. That's it for the day, next time i'll come with more bootstrap and other tutorials, also you will get AngularJS tutorials very soon on this blog. i am planning to cover as much as tutorials i can.BTW Thanks for the support guys, hope you like it.
www.codingcage.com
CSS Navigation Bar
Demo: Navigation Bars
Navigation Bars
Having easy-to-use navigation is important for any web site.
With CSS you can transform boring HTML menus into good-looking navigation bars.
Navigation Bar = List of Links
A navigation bar needs standard HTML as a base.
In our examples we will build the navigation bar from a standard HTML list.
A navigation bar is basically a list of links, so using the <ul> and <li> elements makes perfect sense:
Example
<ul> <li><a href="default.asp">Home</a></li> <li><a href="news.asp">News</a></li> <li><a href="contact.asp">Contact</a></li> <li><a href="about.asp">About</a></li> </ul>
Try it Yourself »Now let's remove the bullets and the margins and padding from the list:
Example
ul { list-style-type: none; margin: 0; padding: 0; }
Try it Yourself »Example explained:
- list-style-type: none; - Removes the bullets. A navigation bar does not need list markers
- Set margin: 0; and padding: 0; to remove browser default settings
The code in the example above is the standard code used in both vertical, and horizontal navigation bars.
Vertical Navigation Bar
To build a vertical navigation bar, you can style the <a> elements inside the list, in addition to the code above:
Example explained:
- display: block; - Displaying the links as block elements makes the whole link area clickable (not just the text), and it allows us to specify the width (and padding, margin, height, etc. if you want)
- width: 60px; - Block elements take up the full width available by default. We want to specify a 60 pixels width
You can also set the width of <ul>, and remove the width of <a>, as they will take up the full width available when displayed as block elements. This will produce the same result as our previous example:
Example
ul { list-style-type: none; margin: 0; padding: 0; width: 60px; }li a { display: block; }
Try it Yourself »Vertical Navigation Bar Examples
Create a basic vertical navigation bar with a gray background color and change the background color of the links when the user moves the mouse over them:
Example
ul { list-style-type: none; margin: 0; padding: 0; width: 200px; background-color: #f1f1f1;}li a { display: block; color: #000; padding: 8px 16px; text-decoration: none;}
/* Change the link color on hover */li a:hover { background-color: #555; color: white;}
Try it Yourself »Active/Current Navigation Link
Add an "active" class to the current link to let the user know which page he/she is on:
Example
.active { background-color: #4CAF50; color: white;}
Try it Yourself »Center Links & Add Borders
Add text-align:center to <li> or <a> to center the links.
Add the border property to <ul> add a border around the navbar. If you also want borders inside the navbar, add a border-bottom to all <li> elements, except for the last one:
Example
ul { border: 1px solid #555;}li { text-align: center; border-bottom: 1px solid #555;}
li:last-child { border-bottom: none;}
Try it Yourself »Full-height Fixed Vertical Navbar
Create a full-height, "sticky" side navigation:
Example
ul { list-style-type: none; margin: 0; padding: 0; width: 25%; background-color: #f1f1f1; height: 100%; /* Full height */ position: fixed; /* Make it stick, even on scroll */ overflow: auto; /* Enable scrolling if the sidenav has too much content */}
Try it Yourself »Note: This example might not work properly on mobile devices.
Horizontal Navigation Bar
There are two ways to create a horizontal navigation bar. Using inline or floating list items.
Inline List Items
One way to build a horizontal navigation bar is to specify the <li> elements as inline, in addition to the "standard" code above:
Example explained:
- display: inline; - By default, <li> elements are block elements. Here, we remove the line breaks before and after each list item, to display them on one line
Floating List Items
Another way of creating a horizontal navigation bar is to float the <li> elements, and specify a layout for the navigation links:
Example
li { float: left; }a { display: block; padding: 8px; background-color: #dddddd; }
Try it Yourself »Example explained:
- float: left; - use float to get block elements to slide next to each other
- display: block; - Displaying the links as block elements makes the whole link area clickable (not just the text), and it allows us to specify padding (and height, width, margins, etc. if you want)
- padding: 8px; - Since block elements take up the full width available, they cannot float next to each other. Therefore, specify some padding to make them look good
- background-color: #dddddd; - Add a gray background-color to each a element
Tip: Add the background-color to <ul> instead of each <a> element if you want a full-width background color:
Horizontal Navigation Bar Examples
Create a basic horizontal navigation bar with a dark background color and change the background color of the links when the user moves the mouse over them:
Example
ul { list-style-type: none; margin: 0; padding: 0; overflow: hidden; background-color: #333;}li { float: left;}
li a { display: block; color: white; text-align: center; padding: 14px 16px; text-decoration: none;}
/* Change the link color to #111 (black) on hover */li a:hover { background-color: #111;}
Try it Yourself »Active/Current Navigation Link
Add an "active" class to the current link to let the user know which page he/she is on:
Right-Align Links
Right-align links by floating the list items to the right (float:right;):
Example
<ul> <li><a href="#home">Home</a></li> <li><a href="#news">News</a></li> <li><a href="#contact">Contact</a></li> <li><a class="active" href="#about">About</a></li></ul>
Try it Yourself »Border Dividers
Add the border-right property to <li> to create link dividers:
Example
/* Add a gray right border to all list items, except the last item (last-child) */li { border-right: 1px solid #bbb;}li:last-child { border-right: none;}
Try it Yourself »Fixed Navigation Bar
Make the navigation bar stay at the top or the bottom of the page, even when the user scrolls the page:
Fixed Top
ul { position: fixed; top: 0; width: 100%;}
Try it Yourself »Fixed Bottom
ul { position: fixed; bottom: 0; width: 100%;}
Try it Yourself »Note: These examples might not work properly on mobile devices.
Gray Horizontal Navbar
An example of a gray horizontal navigation bar with a thin gray border:
Example
ul { border: 1px solid #e7e7e7; background-color: #f3f3f3;}li a { color: #666;}
Try it Yourself »More Examples
Responsive Topnav
How to use CSS media queries to create a responsive top navigation.
Try it Yourself »Responsive Sidenav
How to use CSS media queries to create a responsive side navigation.
Try it Yourself »www.w3schools.com
Site not found · GitHub Pages
Site not found · GitHub PagesThere isn't a GitHub Pages site here.
If you're trying to publish one, read the full documentation to learn how to set up GitHub Pages for your repository, organization, or user account.
adobe-accessibility.github.io


{i['googleanalyticsobject']=r_0.jpg)